CRM
(→40px How to activate CRM?) |
|||
| Line 11: | Line 11: | ||
* '''Sales template''' - here you can choose task or function template. <br><br> | * '''Sales template''' - here you can choose task or function template. <br><br> | ||
Your CRM functionality will be activated right away after saving.<br><br> | Your CRM functionality will be activated right away after saving.<br><br> | ||
| − | |||
---- | ---- | ||
| Line 18: | Line 17: | ||
== [[Image:Beedo_logo_80x65.png|40px]] Quick task "Sale" == | == [[Image:Beedo_logo_80x65.png|40px]] Quick task "Sale" == | ||
<br> | <br> | ||
| − | + | You can quickly create "Sales" type task (or group of tasks) via quick links menu - expand "New task" menu and choose "Sale". <br><br> | |
| − | [[Image: | + | [[Image:crm2_en.png]] <br><br> |
| − | + | ||
| − | + | Attention!!! If you defined your "Sales template" in BeeDo settings you can create the whole function for your sales process with just one click. The template task(s) will be copied as new task(s) with main info (such as description or assigned to) included. | |
| − | + | ||
| − | + | ||
| − | + | ||
| − | + | ||
| − | + | ||
---- | ---- | ||
Revision as of 16:05, 7 February 2013
Contents |
 How to activate CRM?
To activate CRM functionality, you must have contact module. If you don't have, please contact us info@beedo.net.
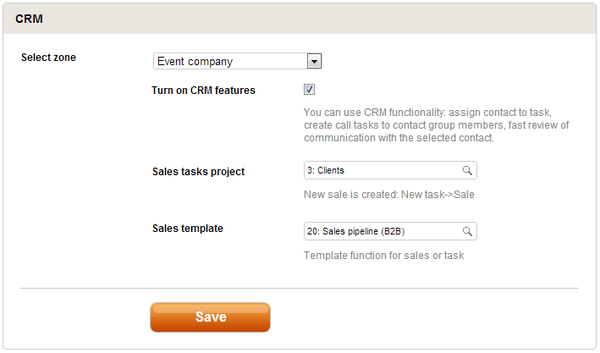
If you already have Contacts module, you can activate CRM in very few steps:
- Open BeeDo settings;
- Choose "CRM";
- Select Space and save.

If you want, you can also define:
- Sales task project - it will be your task blocker;
- Sales template - here you can choose task or function template.
Your CRM functionality will be activated right away after saving.
 Quick task "Sale"
You can quickly create "Sales" type task (or group of tasks) via quick links menu - expand "New task" menu and choose "Sale".

Attention!!! If you defined your "Sales template" in BeeDo settings you can create the whole function for your sales process with just one click. The template task(s) will be copied as new task(s) with main info (such as description or assigned to) included.
 How to add contact to the task?
If you need to enter multiple contacts, import them. Open a contact import table via a quick link menu or by filling in the SMS sending form.

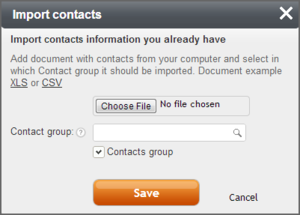
Click link “Import contacts” to open a contact import form. Contacts may be imported from .xls or .cvs documents. Examples of contact lists can be downloaded – they are available in the contact import form. Below you can see an example of a contact list in a .xls format. It is not necessary to fill in all data in the contact file. The same rule applies here as when creating individual contacts – you have to indicate at least one of the data: name, surname, phone number or e-mail address.

Upload a contact file in the contact import form and indicate a contact group to import the contacts to. Click “Save”.

Once the system has imported the contacts, it will display a notice with the key information:
- the number of contacts in your list
- the number of contacts from your list successfully imported
- the number of repeating phone numbers in the list
- the number of contacts which were not imported
You can instantly download a document with a list of contacts which were not imported, indicating the cause for the failure.
You will also see links to the contact group tree and the list of successfully imported contacts.
 How to create "call" tasks quickly?
Contact groups are managed following the usual BeeDo tree control logic.
To rename the contact group (there are three ways to do it):
- double-click the title of the contact group with the left mouse button
- select “Rename” in the expandable contact group menu
- select the contact group and press F2.
To create a contact group of the same level, select the group and click press “Enter”.
To create a subgroup, select the group and press “Insert”.
To move the contact group, click on the title of the contact group with the right mouse button and without releasing it drag the contact group to the place you want.
 Resent communication feed
A contact list is accessible through:
- the main menu. For that, click the “Contacts” tab. When logged on for the first time, you will get a list of all contacts (the ones you have the right to see). If you select a space and contact group in filters – next time you return the system will automatically show you the data that were filtered the last.
- the contact group tree. Move the mouse over the title of a specific group and click on the list icon. You will receive a list of all contacts in the contact group selected.

You can make the following actions in the contact list:
- enter the text or digits into the search field (marked in orange) and click “Find”. The system will filter the entries that correspond to your query and show only those contacts which have the value you indicated;
- select the space or contact group the list of which you want to see. For that, select space and contact group filters (underlined);
- edit contact information by clicking the pencil icon in the “Actions” column;
- delete a contact from the list by clicking the recycle bin icon in the “Actions” column;
- delete all the contacts selected from the list by selecting all or several contacts and clicking “Delete all selected”.
If you want to come back to the full list of the contact group, click the X sign in the search field.
![]()