BeeDo Mobile
(→Applications) |
|||
| (23 intermediate revisions by 2 users not shown) | |||
| Line 1: | Line 1: | ||
<br> | <br> | ||
| + | |||
| + | == [[Image:Beedo_logo_80x65.png|40px]] How to start using BeeDo on your phone== | ||
| + | |||
| + | First of all, you have to create calendars, you wish to see in your phone and we will show you how. | ||
| + | |||
| + | Open BeeDo settings in your browser | ||
| + | |||
| + | [[Image:BeeDo_settings_tasks.jpg]] | ||
| + | |||
| + | Locate "Mobile BeeDo" in the settings menu on the left | ||
| + | |||
| + | [[Image:BeeDo_Settings_menu.jpg]] | ||
| + | |||
| + | Select zone, you would like to setup calendar for | ||
| + | |||
| + | [[Image:BeeDo_Settings_mobile_zone_select.jpg]] | ||
| + | |||
| + | Specify default project, where your tasks from mobile phone will be created. | ||
| + | In the secont field - search and add yourself to see your tasks calendar. As well, you can add as many users from the zone, as you wish, to see their tasks | ||
| + | |||
| + | '''Important''': Default project must be specified! | ||
| + | |||
| + | [[Image:BeeDo_Settings_mobile_project_users.jpg]] | ||
== [[Image:Beedo_logo_80x65.png|40px]] How to configure BeeDo mobile for iPhone== | == [[Image:Beedo_logo_80x65.png|40px]] How to configure BeeDo mobile for iPhone== | ||
=== Account configuration === | === Account configuration === | ||
| + | |||
| + | To setup BeeDo synchronization, follow these simple instructions: | ||
| + | Open up settings from Your main menu. | ||
| + | |||
| + | [[Image:iPhone_main_menu.png|300px]] | ||
| + | |||
| + | Choose "Mail, Contacts, Calendars" | ||
| + | |||
| + | [[Image:iPhone_settings_menu.png|300px]] | ||
| + | |||
| + | Click "Add Account" | ||
| + | |||
| + | [[Image:iPhone_settings_mail_menu.png|300px]] | ||
| + | |||
| + | In the following screen select "Other" | ||
| + | |||
| + | [[Image:iPhone_sync_menu.png|300px]] | ||
| + | |||
| + | Now select "Add CalDAV Account" | ||
| + | |||
| + | [[Image:iPhone_account_type_menu.png|300px]] | ||
| + | |||
| + | Now let's fill in the fields: | ||
| + | Server: cal.beedo.net | ||
| + | Username: Your BeeDo username | ||
| + | Password: Your BeeDo password | ||
| + | Description: BeeDo | ||
| + | |||
| + | After saving, iPhone will check the connection and we are done here. | ||
| + | |||
| + | [[Image:iPhone_dav_setup_menu.png|300px]] | ||
| + | |||
| + | Press Done, after all the checks has passed. | ||
| + | |||
| + | [[Image:iPhone_dav_setup_account_done.png|300px]] | ||
| + | |||
| + | Let`s setup, how often your phone will update BeeDo tasks with the calendar. | ||
| + | Scroll down, find "Fetch" and select 30 minutes (or anything you find comfortable). | ||
| + | Open Advanced | ||
| + | |||
| + | [[Image:iPhone_fetch.png|300px]] | ||
| + | |||
| + | Open your newly created account | ||
| + | |||
| + | [[Image:iPhone_fetch_advanced.png|300px]] | ||
| + | |||
| + | Select "Fetch" | ||
| + | |||
| + | [[Image:iPhone_fetch_beedo.png|300px]] | ||
| + | |||
| + | Then press "Advanced" | ||
| + | |||
| + | [[Image:iPhone_fetch_beedo_advanced.png|300px]] | ||
| + | |||
| + | Scroll down and find "Default calendar". Select it | ||
| + | |||
| + | [[Image:iPhone_default_calendar.png|300px]] | ||
| + | |||
| + | Choose your BeeDo calendar and you are done | ||
| + | |||
| + | [[Image:iPhone_default_calendar_select.png|300px]] | ||
=== Calendar setup === | === Calendar setup === | ||
| + | |||
| + | To see tasks from your newly setup BeeDo synchronization, we have one step to do. | ||
| + | Open your calendar application and click button "Calendars" | ||
| + | |||
| + | [[Image:iPhone_calendar_home.png|300px]] | ||
| + | |||
| + | Check your main BeeDo calendar and you are ready | ||
| + | |||
| + | [[Image:iPhone_calendar_zones.png|300px]] | ||
=== New task === | === New task === | ||
| − | + | To create a new task, go to your calendar application and click "+" button. | |
| + | |||
| + | [[Image:iPhone_calendar_home_new.png|300px]] | ||
| + | |||
| + | In the following screen: | ||
| + | Title is the same as BeeDo task tile. | ||
| + | We will calculate duration of the task automaticaly by the time you enter here. | ||
| + | Double check, that you are adding an event to a correct calendar. A task in BeeDo will be created after your phone synchronizes with BeeDo. | ||
| + | If you delete an event in your phone - task won't be deleted in BeeDo. It will get a status "Closed" | ||
| + | |||
| + | [[Image:iPhone_calendar_new_task.png|300px]] | ||
== [[Image:Beedo_logo_80x65.png|40px]] How to configure BeeDo mobile for Android== | == [[Image:Beedo_logo_80x65.png|40px]] How to configure BeeDo mobile for Android== | ||
=== Applications === | === Applications === | ||
By default Android does not support CalDAV synchronization. To use BeeDo on your phone, you will have to get CalDAV synchronization application: | By default Android does not support CalDAV synchronization. To use BeeDo on your phone, you will have to get CalDAV synchronization application: | ||
| − | https://play.google.com/store/apps/details?id=org.dmfs.caldav.lib | + | * [https://play.google.com/store/apps/details?id=org.dmfs.caldav.lib CalDAV-Sync] - this application is paid via Google Market |
| + | |||
| + | <!-- [https://www.google.lt/#output=search&q=CalDAV-Sync.apk+free+download Search for free CalDAV-Sync] but, we cannot assure of immediate access of it. // Užkomentuota RJ 2015.07.16 nes neveikia su naujais android --> | ||
| + | |||
| + | # Click "Create download link" -> then click on link -> wait until it will download in Downloads directory; | ||
| + | # Go to Settings -> Security -> Device administration -> Unknown Sources: Checked; | ||
| + | # Go to į Downloads directory and click on downloaded file CalDAV-Sync.apk | ||
| + | |||
| + | === Getting and installing Android application === | ||
| + | |||
| + | To use BeeDo in Android, you must install earlier mentioned application. To make the process of downloading and installing easier, we will guide You through the proccess. | ||
| + | |||
| + | First of all, open up BeeDo settings and click on Mobile BeeDo. | ||
| + | You will notice a checkbox, that identifies You as Android user. After checking this - You will receive and email from BeeDo with a direct download link of the application. Open that link in your mobile phone, and the application will be downloaded | ||
| + | |||
| + | [[Image:BeeDO_Android_user.jpg|660px]] | ||
| + | |||
| + | Now go to your Android phones settings menu. | ||
| + | |||
| + | [[Image:Android_main_menu.png|360px]] | ||
| + | |||
| + | Find a tab called "Security" and click it | ||
| + | |||
| + | [[Image:Android_security.png|360px]] | ||
| + | |||
| + | Find a checkbox called "Unknown sources" and check it. This enables you to install applications other then from Play Store | ||
| + | |||
| + | [[Image:Android_sources.png|360px]] | ||
| + | |||
| + | Now find the application, You have just downloaded with Your file manager. Most of the time it is found in a Downloads folder, but may differ depending on your configuration | ||
| + | |||
| + | [[Image:Android_apk_file.png|360px]] | ||
| + | |||
| + | Click the application file and hit "Install" when asked. Thats it - You have just installed and app. | ||
| + | |||
| + | [[Image:Android_install.png|360px]] | ||
=== Account configuration === | === Account configuration === | ||
| Line 33: | Line 171: | ||
In the following CalDAV account window we will setup connection to BeeDo. Enter following data: | In the following CalDAV account window we will setup connection to BeeDo. Enter following data: | ||
| − | Server name: cal.beedo.net | + | Server name: cal.beedo.net |
| − | Username: your BeeDo username | + | Username: your BeeDo username |
| − | Password: your BeeDo password | + | Password: your BeeDo password |
Be sure to leave SSL checkbox on. | Be sure to leave SSL checkbox on. | ||
| Line 41: | Line 179: | ||
[[Image:Android_dav_setup.png|360px]] | [[Image:Android_dav_setup.png|360px]] | ||
| − | CalDAV application will check if the data, You have entered is correct and open a new window with a field. You should enter your email, that you are using in BeeDo | + | CalDAV application will check if the data, You have entered is correct and open a new window with a field. You should enter your email, that you are using in BeeDo and uncheck "One-way_sync" checkbox |
[[Image:Android_dav_name.png|360px]] | [[Image:Android_dav_name.png|360px]] | ||
| Line 60: | Line 198: | ||
=== Calendar setup === | === Calendar setup === | ||
| + | |||
| + | The final step for You to see BeeDo tasks in Your phone is enabling newly setup'ed calendars in your calendar application. | ||
| + | Open it. By pressing menu button you should see a menu with an item "Settings". Click it | ||
[[Image:Android_calendar_popup.png|360px]] | [[Image:Android_calendar_popup.png|360px]] | ||
| + | |||
| + | At the settings menu, there should be a link "Calendars" | ||
[[Image:Android_calendar_menu.png|360px]] | [[Image:Android_calendar_menu.png|360px]] | ||
| + | |||
| + | Select your BeeDo zone to start getting tasks from it in your calendar | ||
[[Image:Android_calendar_list.png|360px]] | [[Image:Android_calendar_list.png|360px]] | ||
| Line 69: | Line 214: | ||
=== New task === | === New task === | ||
| − | + | If you wan`t to create a task in BeeDo through your phone follow these simple steps. | |
| + | Access your calendars menu and choose "New event" (or click on the time in the calendar) | ||
| − | [[Image: | + | [[Image:Android_calendar_popup_new.png|360px]] |
| − | + | Event title in the phone is the same, as BeeDo task title. | |
| + | Planned time will be automaticaly calculated from your selected starting/ending time | ||
| − | [[Image: | + | [[Image:Android_calendar_event.png|360px]] |
| − | + | Now choose calender in which you would like to create a task | |
| − | [[Image: | + | [[Image:Android_calendar_event2.png|360px]] |
| − | [[Image: | + | Description of the event is the same, as BeeDo task description. |
| + | The task will appear in BeeDo after your phone will start synchronization with BeeDo | ||
| + | |||
| + | [[Image:Android_calendar_event3.png|360px]] | ||
<facelikebutton style="2" showsend="0"></facelikebutton> | <facelikebutton style="2" showsend="0"></facelikebutton> | ||
Latest revision as of 10:44, 16 July 2015
Contents |
[edit]  How to start using BeeDo on your phone
First of all, you have to create calendars, you wish to see in your phone and we will show you how.
Open BeeDo settings in your browser
Locate "Mobile BeeDo" in the settings menu on the left
Select zone, you would like to setup calendar for
Specify default project, where your tasks from mobile phone will be created. In the secont field - search and add yourself to see your tasks calendar. As well, you can add as many users from the zone, as you wish, to see their tasks
Important: Default project must be specified!
[edit]  How to configure BeeDo mobile for iPhone
[edit] Account configuration
To setup BeeDo synchronization, follow these simple instructions: Open up settings from Your main menu.
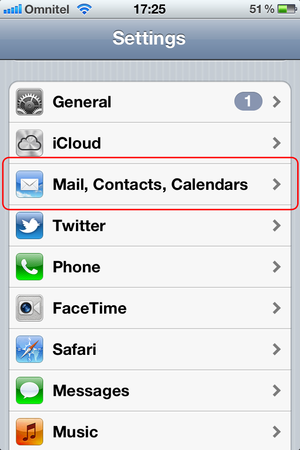
Choose "Mail, Contacts, Calendars"
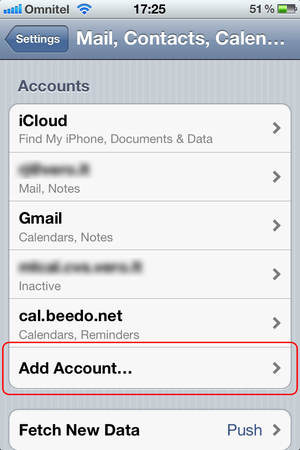
Click "Add Account"
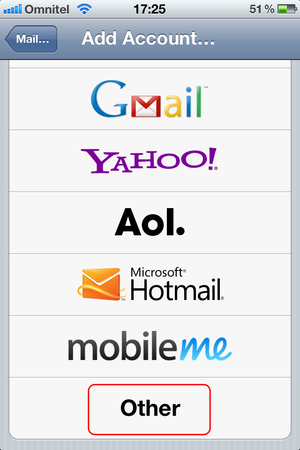
In the following screen select "Other"
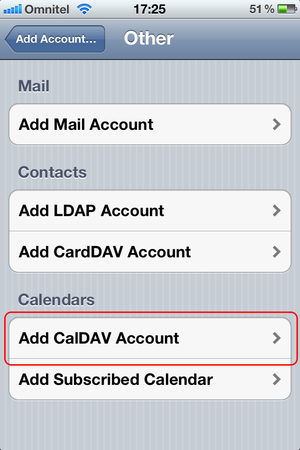
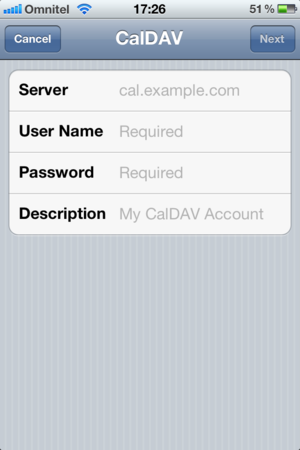
Now select "Add CalDAV Account"
Now let's fill in the fields:
Server: cal.beedo.net
Username: Your BeeDo username
Password: Your BeeDo password
Description: BeeDo
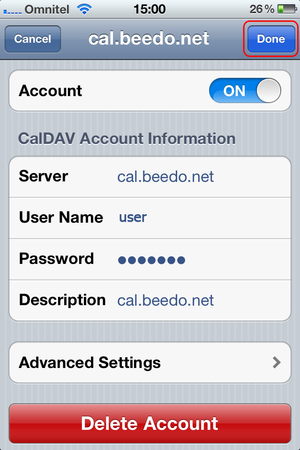
After saving, iPhone will check the connection and we are done here.
Press Done, after all the checks has passed.
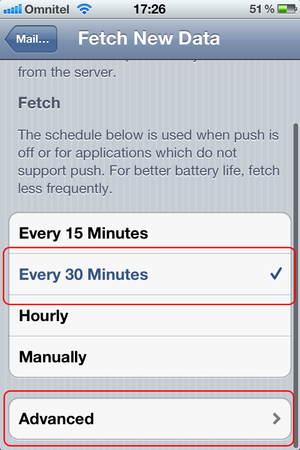
Let`s setup, how often your phone will update BeeDo tasks with the calendar. Scroll down, find "Fetch" and select 30 minutes (or anything you find comfortable). Open Advanced
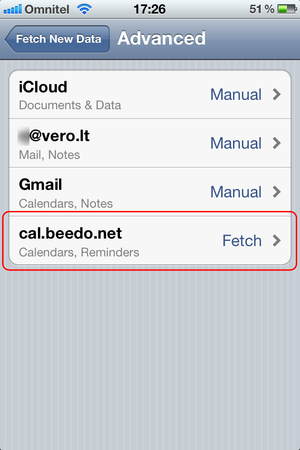
Open your newly created account
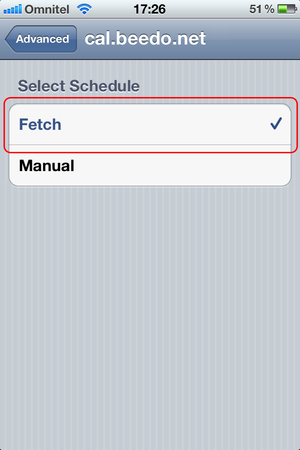
Select "Fetch"
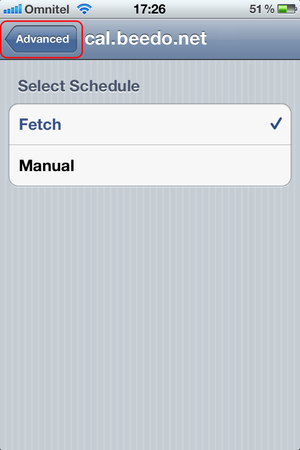
Then press "Advanced"
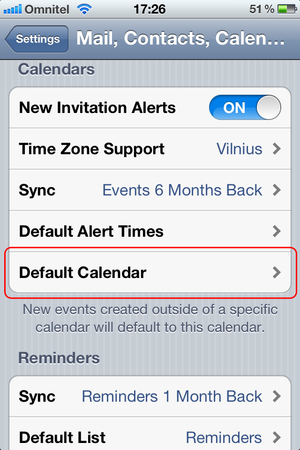
Scroll down and find "Default calendar". Select it
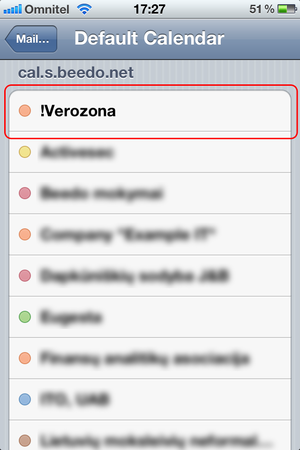
Choose your BeeDo calendar and you are done
[edit] Calendar setup
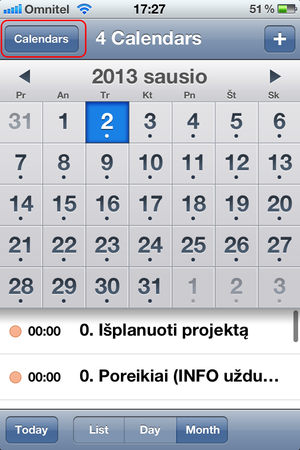
To see tasks from your newly setup BeeDo synchronization, we have one step to do. Open your calendar application and click button "Calendars"
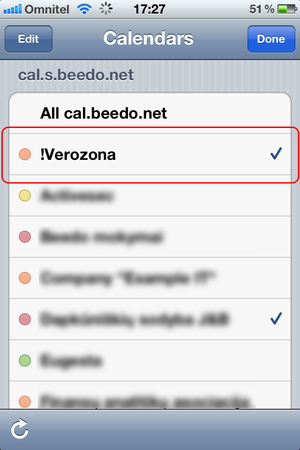
Check your main BeeDo calendar and you are ready
[edit] New task
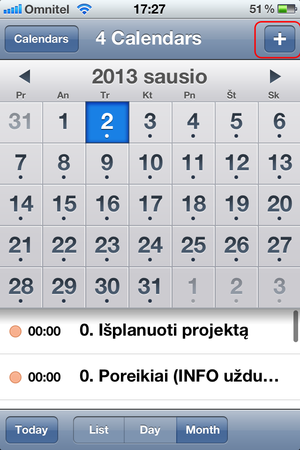
To create a new task, go to your calendar application and click "+" button.
In the following screen: Title is the same as BeeDo task tile. We will calculate duration of the task automaticaly by the time you enter here. Double check, that you are adding an event to a correct calendar. A task in BeeDo will be created after your phone synchronizes with BeeDo. If you delete an event in your phone - task won't be deleted in BeeDo. It will get a status "Closed"
[edit]  How to configure BeeDo mobile for Android
[edit] Applications
By default Android does not support CalDAV synchronization. To use BeeDo on your phone, you will have to get CalDAV synchronization application:
- CalDAV-Sync - this application is paid via Google Market
- Click "Create download link" -> then click on link -> wait until it will download in Downloads directory;
- Go to Settings -> Security -> Device administration -> Unknown Sources: Checked;
- Go to į Downloads directory and click on downloaded file CalDAV-Sync.apk
[edit] Getting and installing Android application
To use BeeDo in Android, you must install earlier mentioned application. To make the process of downloading and installing easier, we will guide You through the proccess.
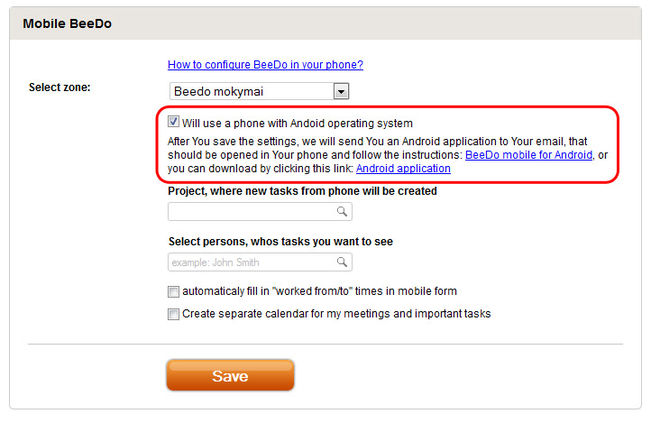
First of all, open up BeeDo settings and click on Mobile BeeDo. You will notice a checkbox, that identifies You as Android user. After checking this - You will receive and email from BeeDo with a direct download link of the application. Open that link in your mobile phone, and the application will be downloaded
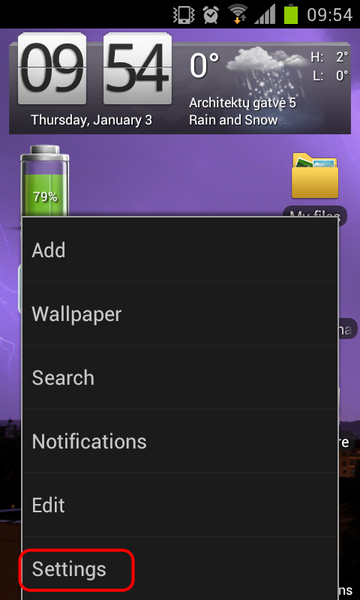
Now go to your Android phones settings menu.
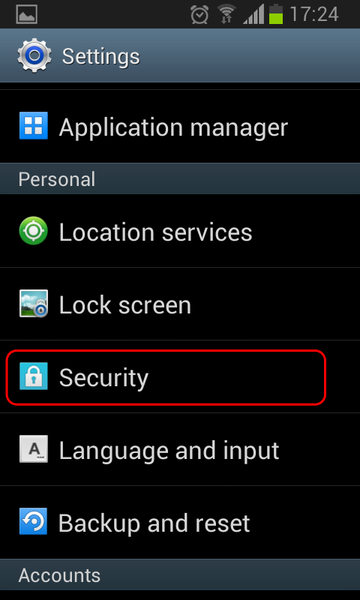
Find a tab called "Security" and click it
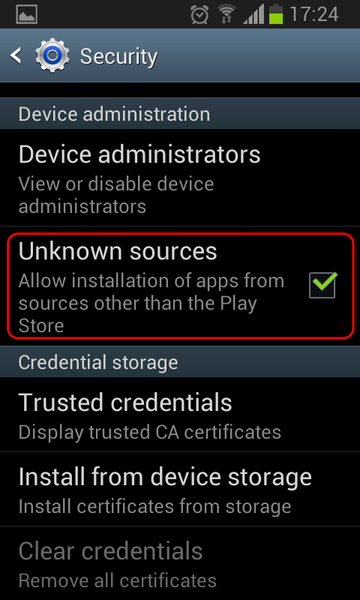
Find a checkbox called "Unknown sources" and check it. This enables you to install applications other then from Play Store
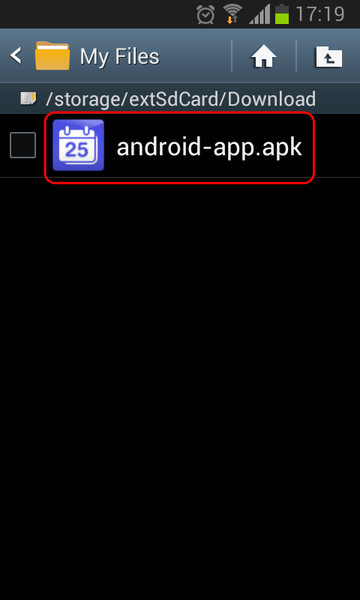
Now find the application, You have just downloaded with Your file manager. Most of the time it is found in a Downloads folder, but may differ depending on your configuration
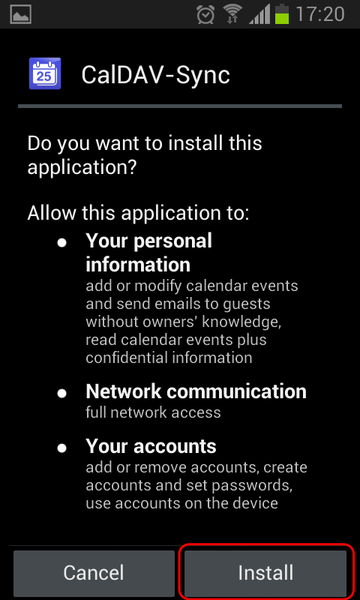
Click the application file and hit "Install" when asked. Thats it - You have just installed and app.
[edit] Account configuration
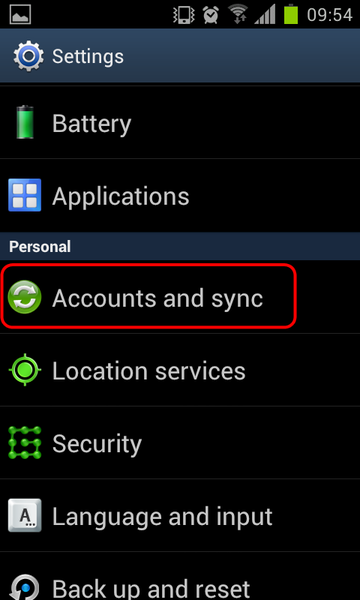
At the main screen of your phone, press menu button and select "Settings"
In the Android configuration meniu find "Accounts and synchronization"
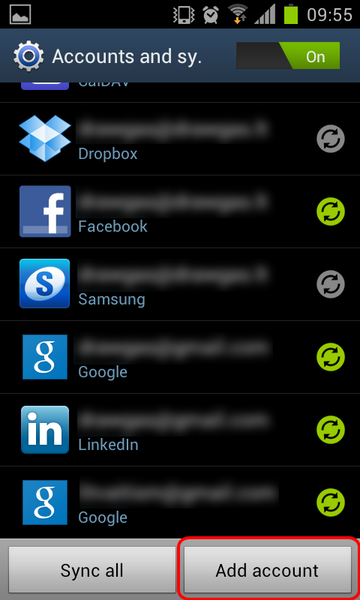
While in the accounts window - at the bottom of the screen click "Add account"
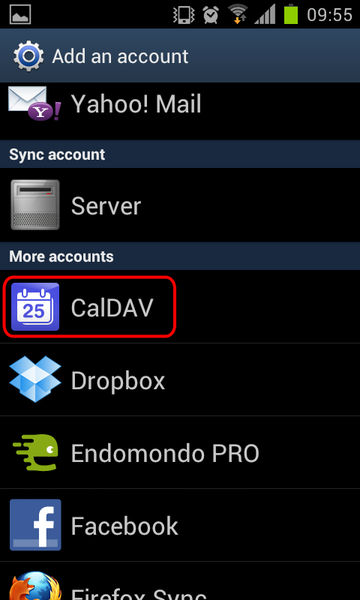
If You have installed CalDAV synchronization application, that was mentioned earlier, You should see CalDAV option in the list. Select it.
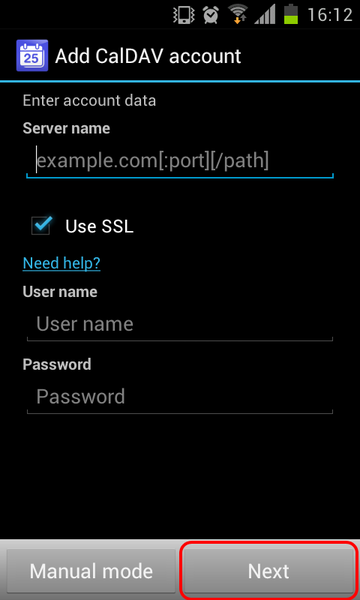
In the following CalDAV account window we will setup connection to BeeDo. Enter following data:
 Server name: cal.beedo.net
 Username: your BeeDo username
 Password: your BeeDo password
Be sure to leave SSL checkbox on.
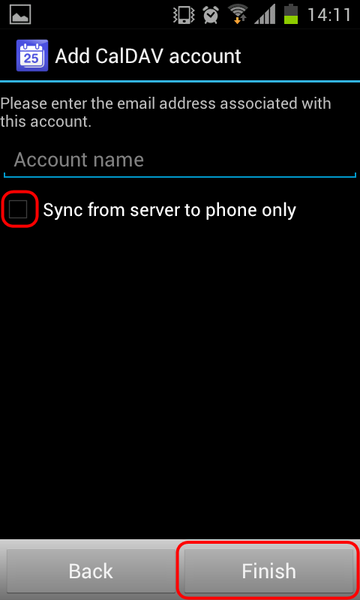
CalDAV application will check if the data, You have entered is correct and open a new window with a field. You should enter your email, that you are using in BeeDo and uncheck "One-way_sync" checkbox
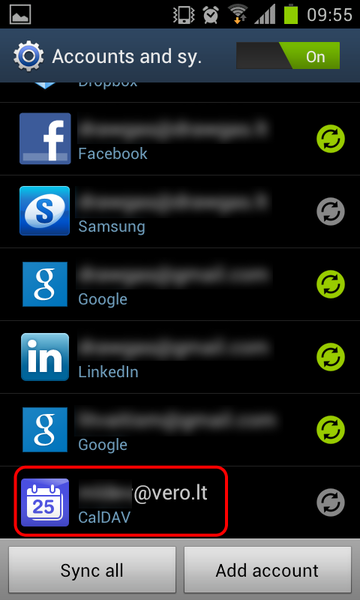
After all the steps, Your new CalDAV account should appear in the list of accounts. Click it.
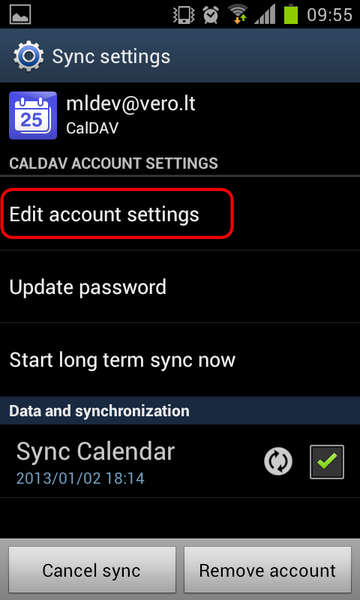
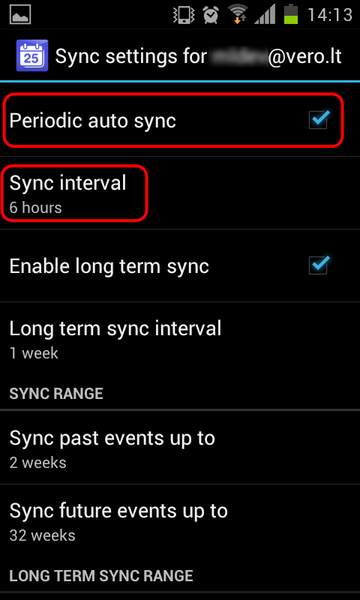
In the following screen, click "Edit account settings". We will change data update interval.
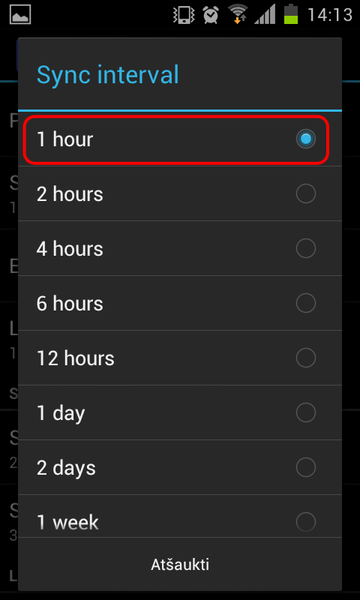
Here you should see a field with a default update interval. Change it to 1 hour. This means, that your phone will synchronize with BeeDo every hour
[edit] Calendar setup
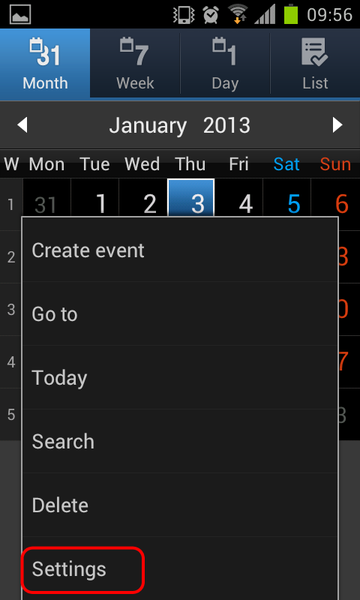
The final step for You to see BeeDo tasks in Your phone is enabling newly setup'ed calendars in your calendar application. Open it. By pressing menu button you should see a menu with an item "Settings". Click it
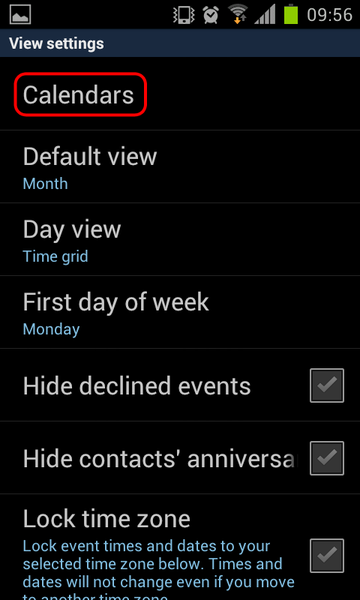
At the settings menu, there should be a link "Calendars"
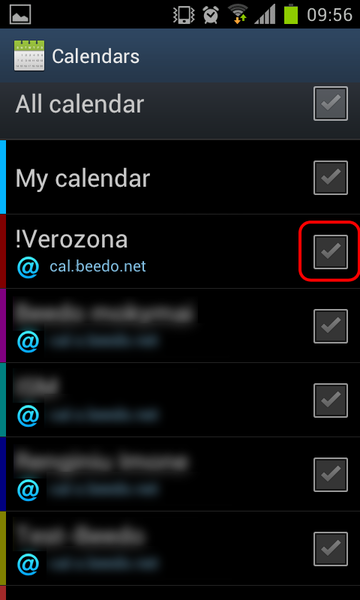
Select your BeeDo zone to start getting tasks from it in your calendar
[edit] New task
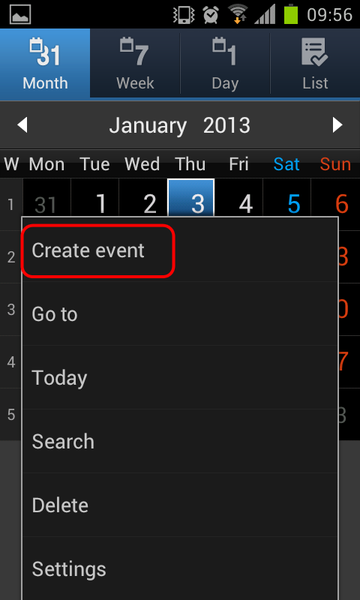
If you wan`t to create a task in BeeDo through your phone follow these simple steps. Access your calendars menu and choose "New event" (or click on the time in the calendar)
Event title in the phone is the same, as BeeDo task title. Planned time will be automaticaly calculated from your selected starting/ending time
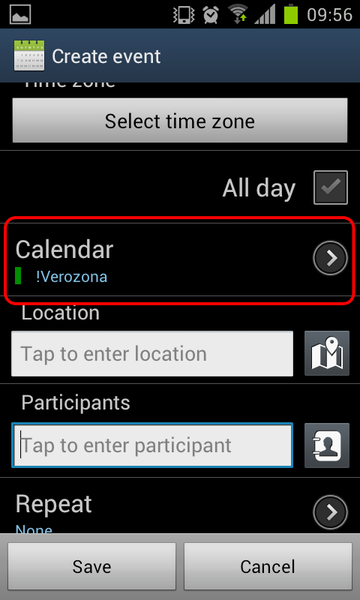
Now choose calender in which you would like to create a task
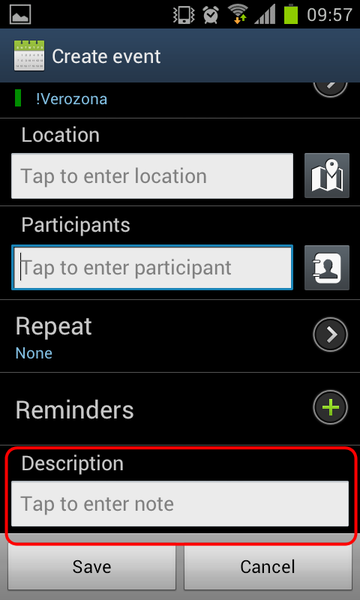
Description of the event is the same, as BeeDo task description. The task will appear in BeeDo after your phone will start synchronization with BeeDo


