BeeDo Mobile
(→Account configuration) |
|||
| Line 16: | Line 16: | ||
=== Account configuration === | === Account configuration === | ||
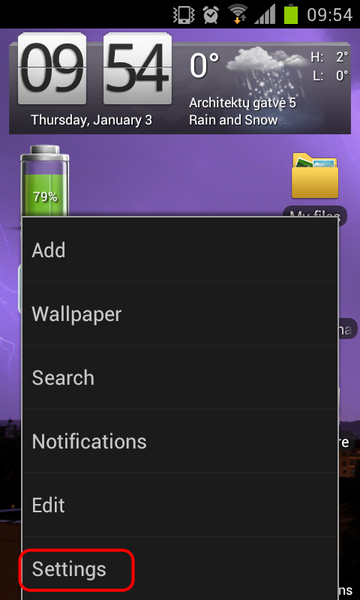
| + | At the main screen of your phone, press menu button and select "Settings" | ||
| + | |||
[[Image:Android_main_menu.png|360px]] | [[Image:Android_main_menu.png|360px]] | ||
| + | |||
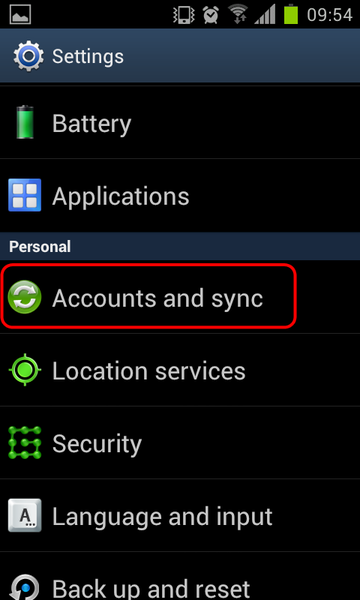
| + | In the Android configuration meniu find "Accounts and synchronization" | ||
[[Image:Android_settings_menu_account.png|360px]] | [[Image:Android_settings_menu_account.png|360px]] | ||
| + | |||
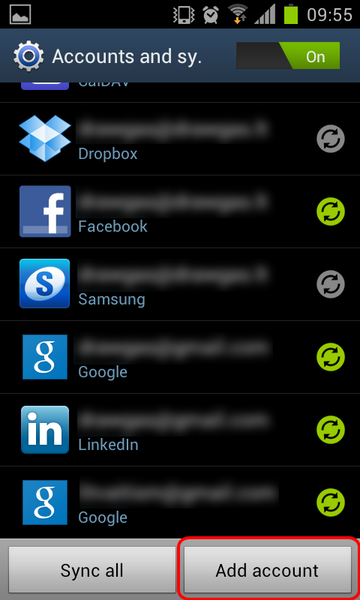
| + | While in the accounts window - at the bottom of the screen click "Add account" | ||
[[Image:Android_accounts.png|360px]] | [[Image:Android_accounts.png|360px]] | ||
| + | |||
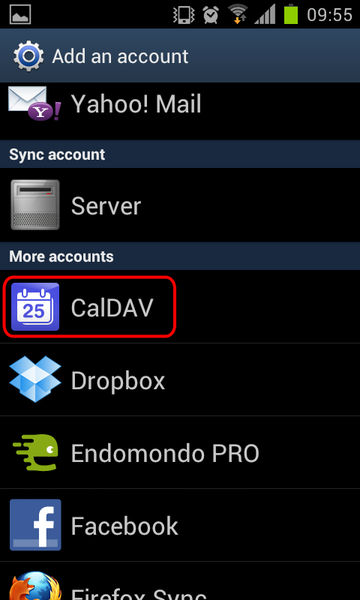
| + | If You have installed CalDAV synchronization application, that was mentioned earlier, You should see CalDAV option in the list. Select it. | ||
[[Image:Android_add_account.png|360px]] | [[Image:Android_add_account.png|360px]] | ||
| + | |||
| + | In the following CalDAV account window we will setup connection to BeeDo. Enter following data: | ||
| + | Server name: cal.beedo.net | ||
| + | Username: your BeeDo username | ||
| + | Password: your BeeDo password | ||
| + | |||
| + | Be sure to leave SSL checkbox on. | ||
[[Image:Android_dav_setup.png|360px]] | [[Image:Android_dav_setup.png|360px]] | ||
| + | |||
| + | CalDAV application will check if the data, You have entered is correct and open a new window with a field. You should enter your email, that you are using in BeeDo | ||
[[Image:Android_dav_name.png|360px]] | [[Image:Android_dav_name.png|360px]] | ||
| + | |||
| + | After all the steps, Your new CalDAV account should appear in the list of accounts. Click it. | ||
[[Image:Android_accounts_with_dav.png|360px]] | [[Image:Android_accounts_with_dav.png|360px]] | ||
| + | |||
| + | In the following screen, click "Edit account settings". We will change data update interval. | ||
[[Image:Android_dav_settings.png|360px]] | [[Image:Android_dav_settings.png|360px]] | ||
| + | |||
| + | Here you should see a field with a default update interval. Change it to 1 hour. This means, that your phone will synchronize with BeeDo every hour | ||
[[Image:Android_dav_interval.png|360px]] | [[Image:Android_dav_interval.png|360px]] | ||
Revision as of 17:52, 2 January 2013
Contents |
 How to configure BeeDo mobile for iPhone
Account configuration
Calendar setup
New task
Entering worked time
 How to configure BeeDo mobile for Android
Applications
By default Android does not support CalDAV synchronization. To use BeeDo on your phone, you will have to get CalDAV synchronization application: https://play.google.com/store/apps/details?id=org.dmfs.caldav.lib
Account configuration
At the main screen of your phone, press menu button and select "Settings"
In the Android configuration meniu find "Accounts and synchronization"
While in the accounts window - at the bottom of the screen click "Add account"
If You have installed CalDAV synchronization application, that was mentioned earlier, You should see CalDAV option in the list. Select it.
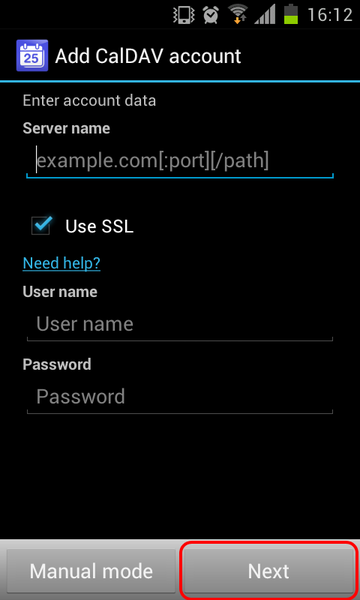
In the following CalDAV account window we will setup connection to BeeDo. Enter following data: Server name: cal.beedo.net Username: your BeeDo username Password: your BeeDo password
Be sure to leave SSL checkbox on.
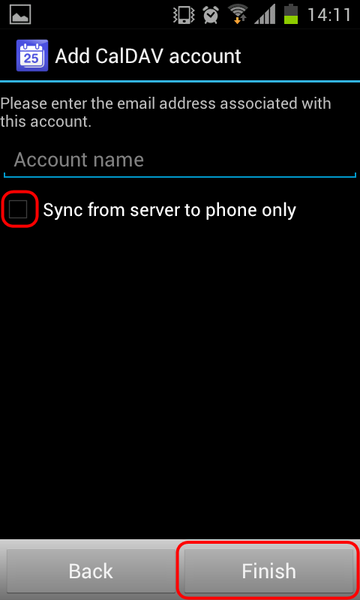
CalDAV application will check if the data, You have entered is correct and open a new window with a field. You should enter your email, that you are using in BeeDo
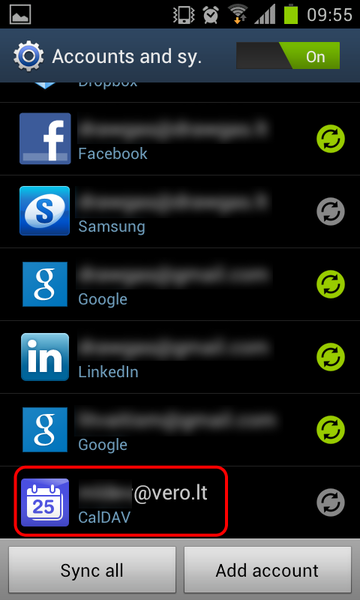
After all the steps, Your new CalDAV account should appear in the list of accounts. Click it.
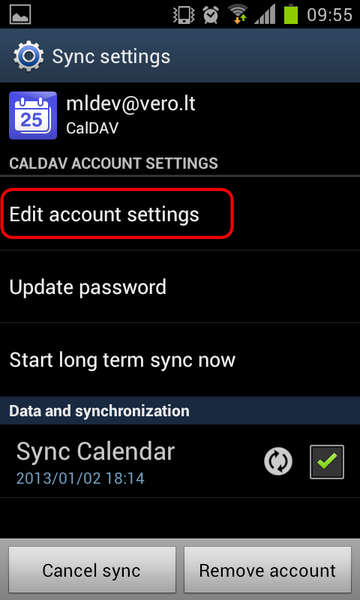
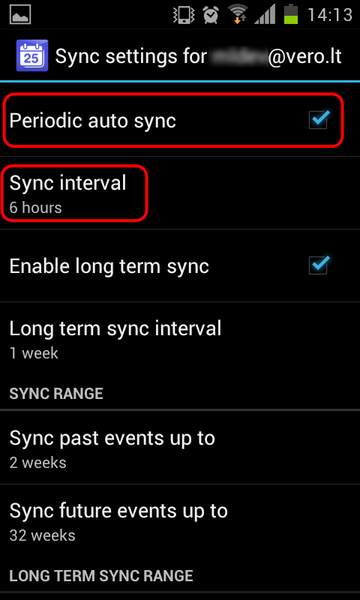
In the following screen, click "Edit account settings". We will change data update interval.
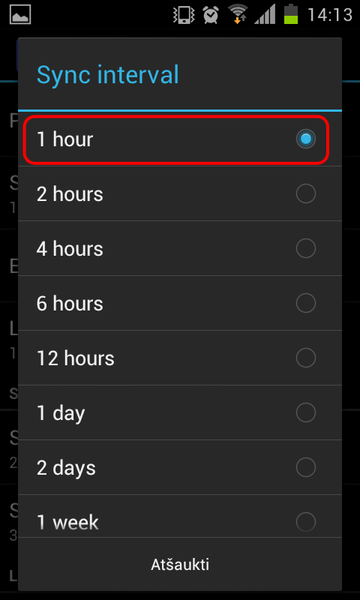
Here you should see a field with a default update interval. Change it to 1 hour. This means, that your phone will synchronize with BeeDo every hour
