Tasks
 How to create a simple task?
Click a “New task” tab.
Enter general information:
- title
- description, where necessary
- date, start time, duration
- select type, priority, space, activity, project on the right side of the tab
- assign the task for a person.
 How to create a task using a project tree?
This method is convenient if you want to create a quick task and already have an opened project tree. In this case, you do not have to indicate the space, activity and priority – the system will automatically complete these fields.
- Click a “Projects” tab.
- Select a task under which you want to create a new one.
- Right-click or click grey arrow and select “Create a task” in the menu.
- Enter the title of the task and click “Save”.
- To complete the task tab, click the pencil which is visible when the mouse is on the title of the task.
Attention! When creating a task via the project tree, you can use “Insert" or “Enter” keys instead of expanding the menu with the right click. Apple computer users may use “Backspace” or “Enter” keys. If you use a smart phone, click grey arrow.
Also you can use quick way to create new task via project tree. Just start creating new task. When you're asked to enter name of the task, enter it and click "More" button. You'll see a pop-up table - fill all the fields you want and save it. Creating new task this way you will not need to open task edit.

 How to create a task using the task list?
- Click a “Tasks” tab.
- Click the “New task” button below the list of works of the day.
- Complete all fields and click “Save”.
 How to create a quick task using working time history?
This method is usually used to enter a task that was not planned, did not take long and is already competed (fully or in part).
- Select a “History” tab.
- Enter what you have done in the comment field.
- Complete the remaining fields.
- Click “Save”.

For more about working with history reports see Chapter “History”.
 How to finish a task quickly?
To close the task using the task list table, click the tick mark in the “Actions” column. Enter the necessary details in the table that opens and save.

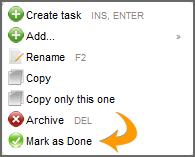
To finish a task quickly using the project tree, click “Projects”. Find the necessary task and click the right mouse button – select “Mark as finished” in the menu. You can finish a task using this method with a smart phone. In such a case, to expand the menu, click the grey arrow next to the title of the task.
 How to create task “Meeting”?
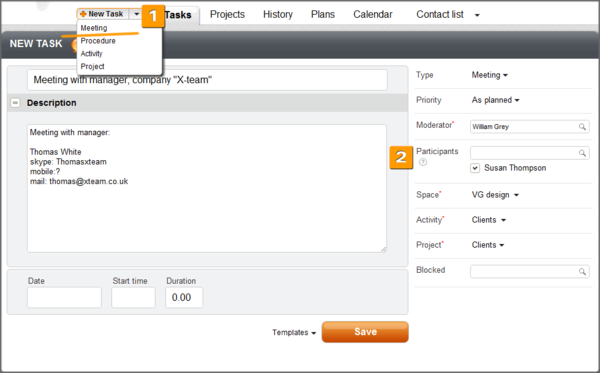
1. Click the arrow next to a “New task” tab and select “Meeting”. Complete the necessary fields.
2. Specify the moderator and participants of the meeting and click “Save”.
With the “Meeting” task you can create:
- tasks for discussion about the operation,
- tasks for work in groups.
Please note that a new task is created for every participant.
It is recommended to enter the topic of the meeting in the title field, and the agenda in the description.
Once the task is saved, you can see that e-mails were sent to all participants of the meeting. Next to the participant’s name you will see a code – it is a reference to a task which was automatically created and assigned to the person concerned. You can add comments to such a task for every participant individually.
![]()
The system allows you to monitor the progress of the preparation for the meeting. Click “Task in the tree” in the task tab.
What to do to make the meeting efficient:
- Formulate a clear title and choose the topic for the meeting.
- Create the agenda and put it in the description field of the task. Indicate the precise date, the beginning and duration of the meeting.
- Appoint the moderator and secretary of the meeting in advance.
- The meeting should be no longer than 45 minutes.
- Ask for the feedback of all participants (even those who did not say a word).
- Add the resume of the meeting to the task.
- Plan further steps.
 How to use a “New task” tab?
The tab on the top of the page is for creating a new task. To create a simple task, click the tab and complete all the necessary fields.
You can quickly create:
- simple tasks;
- project;
- meeting task;
- procedure;
- activity;
- call task;
- sale task or function;
- event.
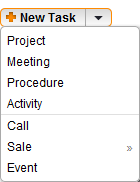
To create a task click the arrow next to the tab and from the drop-down menu select the type of task. Once you are done, a task editing tab will open.
 What is the “Day Plan” task for?
Day Plan task is the time given to plan the day. Performing a plan of the day task you create all works to be done during the day, distribute them by time and duration. Every task is evaluated in advance, therefore when creating a plan of the day you:
- develop a clear list of all works to be done on that particular day and see all the task in one place;
- actually plan your whole day;
- don’t plan works that you will not be able to do;
- won’t forget even the smallest works.
 How to create repetitive tasks?
To create repetitive tasks, copy the existing ones or create procedures (for more about procedures see Chapter “Procedures”).
- Click “Projects”. In the project tree find the task you want to copy.
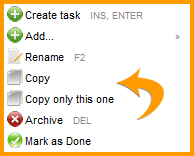
- Select the task by clicking the right mouse button on it – the task menu will pop up.
- Here, you can select: copy the whole task branch (the main task together with smaller tasks underneath it) or the specific task.
- Select the activity, project or task under which you want to create a duplicate.
- Open the task menu again and select “Paste”. The task is successfully copied. You can open it to edit.
 How to create tasks which belong to several projects?
1. Create a task.
2. Click “Projects”.
3. Find the project to assign the task to. The example below shows that a task is created for project “Clients”. Now, assign the same task for project “Projects - 2012 3 quarter”.

4. For this, open the task editing tab (double-click the title).
5. There is field “Blocked” on the right side of the tab.

6. Enter the project number or the beginning of the project title in the empty field – the system will give you a list of tasks or projects which correspond to the criteria. Select the one you are looking for and click it. An additional line will show up with the project title and a tick next to it. To unlink the task from one of the projects, remove the tick.

7. When returned to the project tree, you will see that the task is added to the other project. The title and number of the task will remain the same as it is the same task.
 How to create tasks for several people at once?
To make the same task visible for several people, you can:
- add other persons in the “CC” field in the task editing form. In such a case, all people, assigned to this task, will receive e-mails about any changes to the task. All these people will see changes related to the task. They will be able to make comments on the task;
- create several identical tasks and assign them to all the each person individually. If this is the case, you will receive the results from different people, but the members will work only with the tasks assigned to them. To get the overall result, you will have to additionally process the data;
- create a “Meeting” task. For more about the creation of a meeting, see “How to create task ‘Meeting’?” in Chapter “Tasks”.
 How to change the view of a task list?
If you don’t like the view of the task list which is automatically offered by the BeeDo system, change it.
- Click “Tasks”.
- Select the view of tasks – a simple list or tasks grouped by day.
- Click the “wheel”.

In the pop-up window you will see two fields:
- Current fields. Fields which are already visible in your task list. Fields of the task number, “about” and actions are marked in grey – they are always visible. You can change their position only.
- Other possible fields. Fields that may be added and visible in your task list.

To change the position of fields in the list, click the field and drag it to the place where you want it to be. In this way you can choose the fields and their arrangement. To save the arrangement, click “Save” – all the table will be rearranged according to you.
 List of ungrouped tasks
To see all tasks of a certain period ungrouped in a common list, click “Tasks” and select “List” on the right.

Set filters and the date – the system will deliver a list of tasks that correspond to all your requirements. To change the settings of columns, click the “wheel” on the right. For more information see “How to change the view of a task list”.
![]()
All entries may be grouped in the ascending or the descending order.
In the example above you can see the arrow next to field “Start Time”. It shows that the tasks are arranged by starting time in the descending order. To arrange entries, click the title of the column.
Changing the date. To change the date:
- click the date of a particular entry – select the date in the pop-up calendar;
- drag the title of the task on the date of another task;
- open the task editing tab and change the date of the task.
To change the start time, the planned and remaining duration, click the digits and enter the necessary value.
Clicking the title or number of the task opens a task editing tab.
One of the most important functions of the ungrouped list is a convenient summary of tasks of the day or week. In this summary you can clearly see all the tasks planned and completed within the period you chose (don’t forget to turn on the filter).
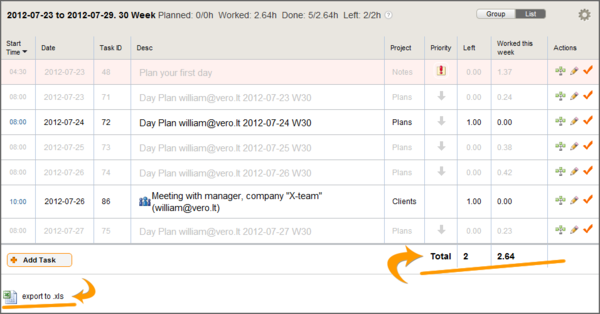
The example presents a summary of one day that hasn’t end yet. It clearly shows what has been done and what has to be done. You can also see the total working time planned, how much time is still left and how much time the tasks took. Such a report may be used when planning or evaluating a project. All data of the ungrouped list may be exported to the .xls format.
 How to view the history of a task?
The history of a task consists of changes from the creation of a task. To view the history of a task, select the task and open its editing tab. Find field “Other” on the right side of the tab and select “History”.
Click it and you will get the whole history of the task you selected.
Fields that are in the table:
- * E-mail – BeeDo member who made the changes;
- * Date – the date and exact time of changes;
- * Title of the field – the column that was changed;
- * Deleted value – value that was changed;
- * Added value – new value entered in the field.

Attention! At the bottom of the table you can see information on the number of the changes made. In case of many changes, the table will have additional pages. The table shows entries starting with the latest ones.
 How to create a task template?
A task template is a saved, fully or partially completed task tab which is not assigned to a project tree. Task templates are convenient for irregularly recurring tasks (calls, meetings, etc.).
- Select a task you want to save as a template. You can create a new task or open the existing one.
- Next to button “Save” at the bottom of the tab, open a template filter. Here you will see all saved templates and three tasks that were saved the last.
- Check if all the fields are completed – these fields will be saved therefore complete only those fields that will not change or will have only minimum changes.
- Click “Save as a template”. Your template will be saved in the general list of templates.
- If when creating a new task you want to use a template, expand the filter and select a template.
- If the template is not relevant anymore, delete it by clicking the recycle bin symbol next to the title.
Attention! A template may be created only on the basis of a task that is saved. If you create a template according to a new task, save the task first.
 How to quickly count the time spent on tasks?
If you work on one task, use a quick time input function. You activate it through the BeeDo settings:
- Click “Settings” and select “BeeDo settings”.
- In the window that opens select “Time input control”.
- Tick the “Quick time input function”. If you want to enter a comment once the time spent on the task is counted, tick “Comment”.
- Click “Save”.

When returned to the task list, you will see green clock icons next to every task (except for functions and their stages).
When you move the mouse on the task’s clock, you will see an information notice “To start time counting”. Click the clock and counting of the time of the task you select will start.

When the time of the task is being counted, the colour of the task turns to pink with a green border. The clock becomes red. In this way you will see the task you are currently working on, or to be more precise – the task the time of which is being counted.
Move the mouse onto the red clock to see how long you are working on the task. To stop the time counting, click the clock.

If you have not chosen the obligatory commenting option, after the time counting is stopped entry “I was working” will automatically appear in the working time history report and comments of the task. The time you spent working on the task will be added to the task.
If you have chosen the obligatory commenting option, after the time counting is stopped the system will deliver the table below:

Here you can enter a comment or adjust start and end times or the duration.
Attention! When the time counting is stopped, the task is not marked as completed. Only the time spent on working and the comment are entered. To close the task, you can use the quick task completion option by putting a tick mark next to the clock.
The time may be counted for one task only. So, if the time counting has started for one task:
- When the time counting of another task starts, the time counting of the first one stops.
- The time counting stops upon closing the list of tasks.
- The time counting stops upon the end of the session (after 8 hours from the last action in the BeeDo system).
- In all the cases above, the time is recorded for the task and comment “I was working” is entered into your history report and task comments.
 How to change a task status?
Usually, a task status is changed in the task editing tab by entering the time you spent on working and a comment, or using a quick task completion function.
To change a task status without entering a comment and/or the time you spent on working, use the task list.
For this, click “Tasks” and in column “Status” expand the status menu of the task you want.

 How to assign a task for another employee?
You can appoint/change the responsible person:
- through the list of tasks (tasks of the day/week or project tasks), if there is column “For”. Click the e-mail address of the current person, enter a new e-mail address and save – the task will be assigned to a new person.
- through the task creation/editing tab by indicating the responsible person in field “Assigned to”.
Attention! A task can be assigned to a person which is not registered to the BeeDo system.
Enter the e-mail address of the non-registered user in field “Assigned to” or “For” and click “Invite”.

Indicate the new member’s name, surname and save. The invited user will receive an invitation to connect to BeeDo and complete the task.


